

A watermark is usually a symbol, text, logo, or message attached to an image to personalize it.
Watermarks are absolutely essential for a personalized photograph experience. It’s kind of like a photo signature.
Using your favorite (and frankly the best) online photo editor, here’s a step by step process on how to add a watermark to your photograph.
Step 1: Get to the landing page of text2photo
Sure, this is a pretty simple step — like all the other steps. Click this link to get to the landing page.
Step 2: Upload the image you’d like to add a watermark to
A pretty obvious step, eh? Still, we’d like to make it as clear as possible. There are two ways to upload an image on text2photos;
You can either drag your selected image into the box with the “Drop your image here” inscription. This method works best if you’re using a PC and the selected image is easily accessible.
OR
You can click on the “Select Image” option. This should then open your device’s file manager, presenting you with options to navigate your folders and select the image you’d like to use. Depending on what your preferred watermark format is, you can either go with Step 3 (text) or Step 4 (logo).
Step 3: Enter your selected text into the text box
If you’d prefer your watermark to be a text (for example your name or the place the image was taken), this step is for you.
Once you’ve uploaded your select photo, a text box immediately appears. Enter the text you’d like to watermark onto the photograph.
Here’s more helpful information to take note of when using the text box;
To move the text box to any part of your selected image, click the “cross” arrows and it’ll enable you to drag the text box anywhere you want.
Text box size is adjustable. To do this, select any gray circle on the four edges of the text box and manipulate the size at will. No need to cram a long sentence into a small box when you can just enlarge it!
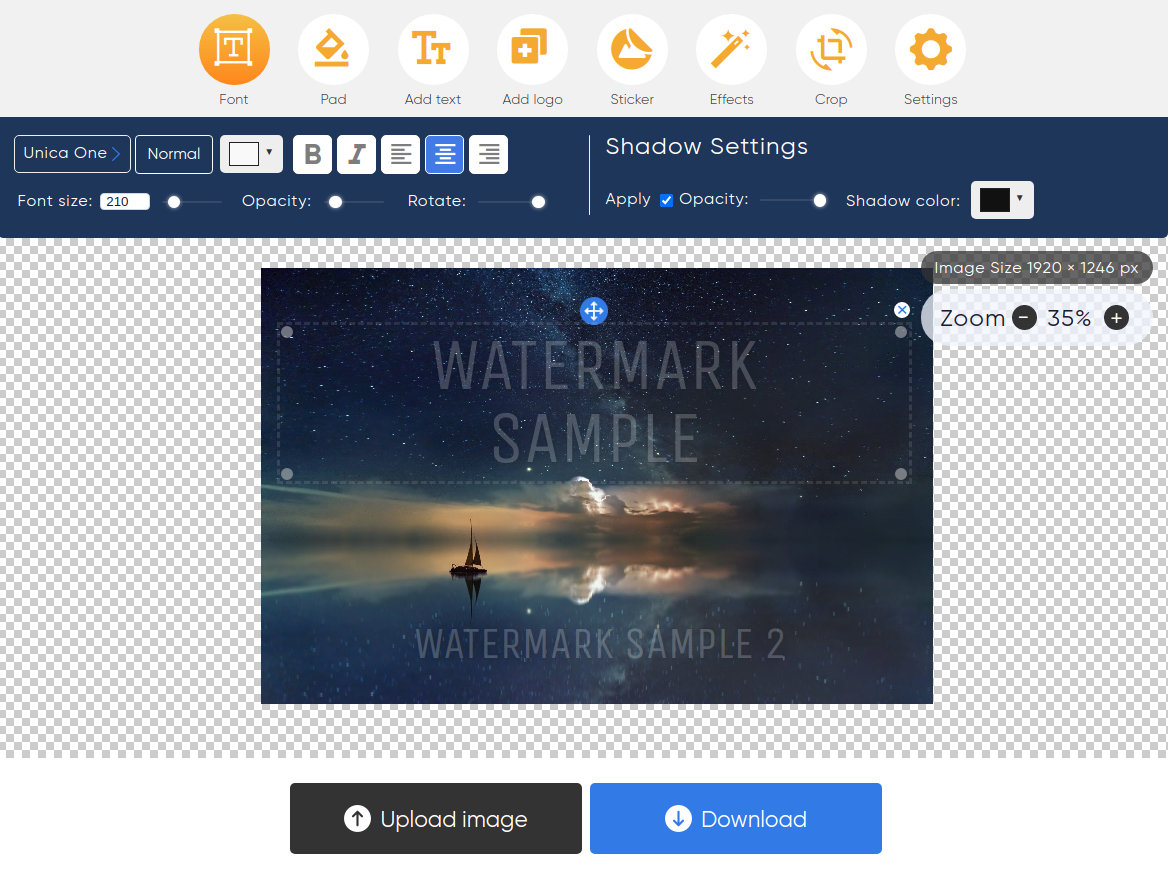
You can create multiple text boxes. If one isn’t going to cut it for you, click the “add text” icon at the top of the image to add a new text box. Each text box can be formatted in different ways — so you won’t feel stuck at all.
Any text box can be deleted by selecting the “x” icon located at the outer edge of the box.
One last thing, you can adjust the opacity (transparency) of your text any way you want — from shining white to being as clear as glass.
Step 4: Bring your logo to the front of the image
On the top of the image are several icons including “font”, “pad”, “add text” etc.
To add a logo, click on the “add logo” icon. Your device should then open up the file manager so you can select your logo file from there.
You can add as many logos as you want by hitting the “add logo” option multiple times.
Logos can also be deleted easily. Look for the “x” icon attached to the logo to make it disappear.
Side tip: Text2photo automatically displays a text box over the image. Not to worry, this does not stop you from adding a logo. You can simply ignore the text box or delete it.
Step 5: Edit your watermark to your taste
Text2photo provides options for you to rebrand your logo or text to help you make the best watermark — resizing, rotating, formatting, mobility and opacity.
You can adjust/edit the size and opacity of your selected logo or text. You can also rotate your watermark in any direction you choose. Logos are also easily movable by dragging the “cross arrows” icon to your preferred location.
Selected text can also be formatted (bold, italic, size, etc) to desired taste.
Step 6: Hit “download”
Your watermark is ready and affixed to your image. Your sign is permanent.
All that’s left is to hit the download button.
Now, you can make photos even more personal, anytime you want.